
Hitting that February slump? Don’t roll up your yoga mat just yet. Sticking to any New Years resolutions – let alone fitness goals – are hard enough but don’t let that get you down. Instead of focusing on the end game, focus on the process and set-up small, realistic goals along the way so you always feel like you’re making progress – that way you won’t lose your motivation. In a city as busy as Hong Kong, it comes as no surprise that yoga is one of the most popular workouts in the city. It helps to reduce stress and increase both strength and flexibility.
We spoke to two of Pure Yoga’s alented yoga instructors, Morgan Guth (World Trade Centre) and Tryphena Chia (Asia Standard Tower) to ask them for tips on the most common mistakes they see – by both newbies and regular yogis – and how to fine-tune some of the most common yoga poses.
Downward Dog
What you’re doing wrong: “Quite often, people who don’t do that much yoga or beginners I see this rounded shape in the back, the feet too wide, the palms – just anywhere, not properly aligned. You want the sitbones to be reaching to the ceiling as opposed to being rounded through your back. A lot of beginners aren’t able to stretch the legs straight, so you get this roundness shape and the weight too much in the hands as opposed to in the feet.”
“And of course, if you’ve been practicing for many years – you can go into a further shape, such as dropping the head down and releasing the shoulders. However, that means you might lose the awareness in the back. So I usually recommend bringing them back up into a shape that is more supportive.”
What you should be doing: “The first thing I’d look for are feet hip distance apart, hands shoulder distance apart and fingers spread wide with the knuckles pressing down. The legs and arms should be both straight – and you should focus on placing more weight towards the lower part of the body and making sure the hips are lifted up.” – Morgan Guth
Chair Pose
What you’re doing wrong: “You don’t want to shorten the lower back, so you need to make sure your pelvis lifts up and your back stays straight. Avoid arching your upper body forward and try keeping the weight of the pose in your heels, like you’re sitting back onto a chair.”

What you should be doing: “There are different schools of thought but I come from a very traditional school, so I teach chair pose with the feet together – big toes touching, heels slightly apart. Make sure your knees follow the feet and focus on shifting the weight back to the heels so your toes are not gripping the floor. Push the knees back and squeeze your inner thighs, pulling the belly button up.” – Tryphena Chia
Side Plank with Tree
What you’re doing wrong: “Side plank just on its own, is a really strong pose on the arms, on the core and on the side oblique muscles so a lot of people tend to drop their hips too low. This means they’re unable to lift up through the side waist and aren’t fully supporting themselves with their arms. If the arms are a bit bent or out of alignment, you lose the balance.”
What you should be doing: “For starters, in side plank, the hips need to be lifted and the shoulder should sit over the first with the top arm straight above the shoulders, so your body is all in line. I usually often say, bring your top leg in front for support but people tend to not want to take those options as they feel like it means they’re doing less. However, it’s better to begin the pose correctly rather than struggling out of the pose.” – Morgan Guth
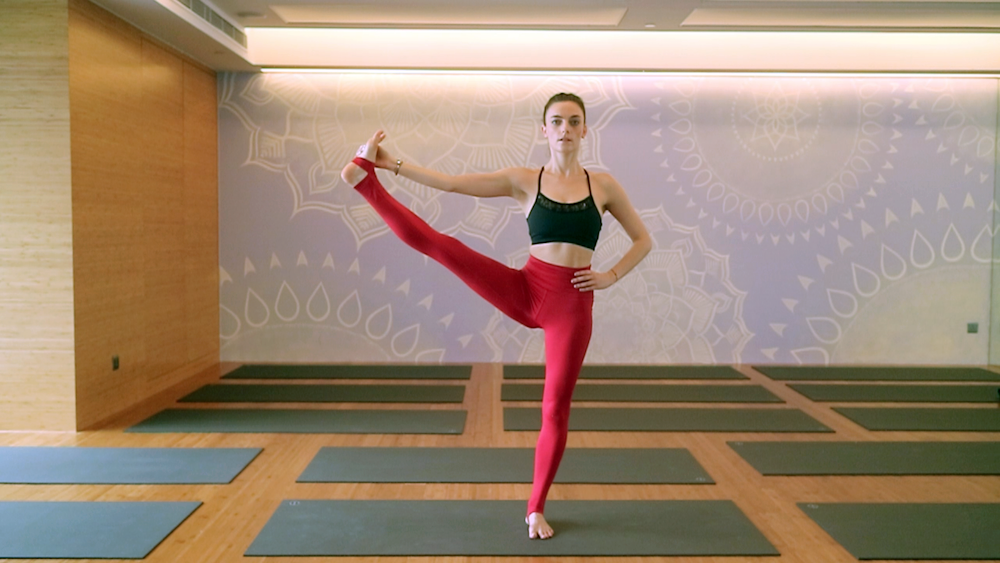
Half Moon
What you’re doing wrong: “This pose isn’t about touching the floor with your bottom arm. It’s about creating length and finding a sense of lifting in the movement. The lower leg should be straight and instead of hyper extending the leg in the pose, you want to use the quadricep muscles to help support you.”
What you should be doing: “For beginners and advanced practitioners alike, the block can be very useful for this pose. You want to stack your shoulder right above the wrist with your arms stacked in a straight line. You also want to create a straight line from the top of your head to the upper foot. The bottom foot should be facing straight forward and you want to think about pressing down through the big toe of the foot and centre of the back heel with the entire leg straight and strong.” – Tryphena Chia
Bridge to Wheel
What you’re doing wrong: “A lot of people just want to get up and get straight into the wheel pose. Since there’s no awareness of the legs and arms, in this case then they struggle to find the strength in the arms or legs to push up. If you’re struggling to get up, you should focus on the bridge pose first.”
What you should be doing: “The bridge pose acts as a preparation pose for the wheel. You should squeeze your shoulder blades underneath you and lift your chest and hips. Your feet will follow and you’ll start to feel the next pose already. Once you have that lift in the chest and hips, your arms can then take over and you can bring the top of your head to the map before simply pushing up.” – Morgan Guth